
Evolved Office + AgentDealer Integration: Admin Setup & Configuration Guide
Use this guide to configure the Evolved Office integration for AgentDealer.
This article is intended for the Salesforce administrator responsible for assigning user access, connecting the integration, configuring contact synchronization, and making Evolved Office functionality available to users.
Note: This guide assumes the Evolved Office for AgentDealer integration has already been installed in your Salesforce environment. The steps below focus on configuration and user access.
Before You Begin
You will need:
- Salesforce System Administrator access
- The appropriate Evolved Office integration credentials when you reach the connection step
- Access to the Evolved Office for Agent Dealer application in Salesforce
Because AgentDealer is built on the Salesforce platform, some configuration steps in this guide are completed through Salesforce tools such as Setup, Object Manager, Permission Sets, Page Layouts, and Lightning App Builder.
Step 1: Assign Evolved Office Permission Sets
Permission Sets determine which Evolved Office features each user can access.
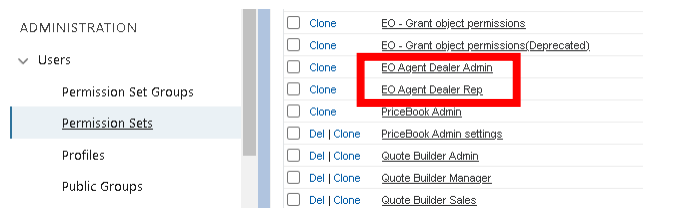
Assign the appropriate permission set based on the user's role. The current integration includes two primary permission sets.
EO Agent Dealer Admin
Assign EO Agent Dealer Admin to users who need broader access to the Evolved Office integration.
This permission set provides access to the Evolved Office package tabs and filtering functionality for Accounts and Contacts. The EO Set Up area remains an administrator-level configuration function.
EO Agent Dealer Rep
Assign EO Agent Dealer Rep to sales representatives who only need access to the campaign-related functionality available through the Broadcasts tab.
Check Your Work
After assigning permissions, verify that the user can access the appropriate Evolved Office functionality.
If a user does not see the expected tabs, confirm that the correct permission set has been assigned before continuing.
Step 2: Open Evolved Office for AgentDealer
- Open the App Launcher (nine-dot icon).
- Select Evolved Office for Agent Dealer.
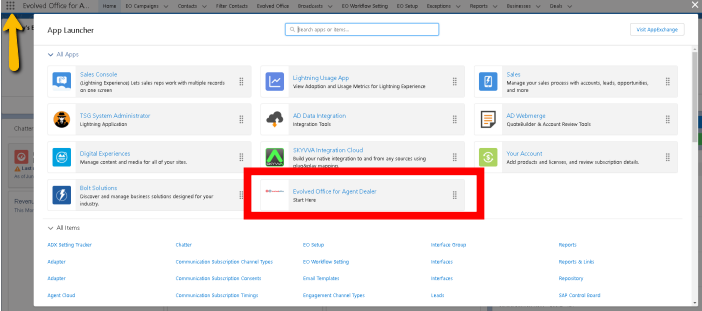
Depending on the user's permissions, the application may include:
- Evolved Office – Auto-login to the Evolved Office portal
- EO Set Up – Authentication and sync configuration
- Filter Contacts – Advanced filtering across AgentDealer objects
- EO Campaigns – Marketing lists synced to Evolved Office
- EO Workflows – Automation based on engagement
Don't See the Expected Tabs?
Confirm that:
- You selected Evolved Office for Agent Dealer from the App Launcher.
- The correct Evolved Office Permission Set is assigned.
- You are logged in as a Salesforce System Administrator if you are trying to access EO Set Up.
- If you're still having trouble, verify your Evolved Office setup for the AgentDealer integration.
Step 3: Connect Your AgentDealer Environment to Evolved Office
The next step is to connect the integration to your Evolved Office account.
- Open the EO Set Up tab.
- Enter the Evolved Office Username and License Key provided for the integration.
- Check Sync Enabled.
- Click Connect.
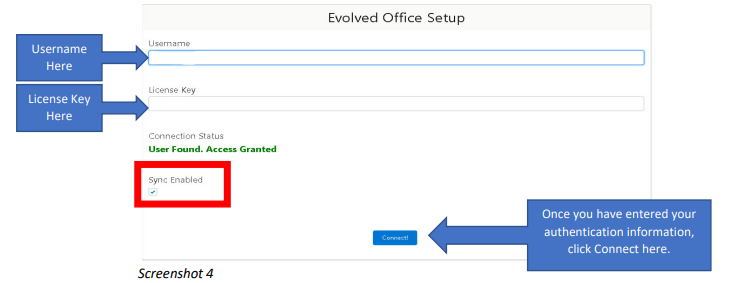
When the connection is successful, a confirmation message should appear: "User Found. Access Granted."
Check Your Work
Before proceeding, confirm that the connection was successful.
If the connection fails:
- Verify the Username.
- Verify the License Key.
- Confirm that Sync Enabled is selected.
- Click Connect again.
Step 4: Configure Contact Field Mapping
Field Mapping determines how Contact information is synchronized between AgentDealer and Evolved Office.
From EO Set Up:
- Review the default Salesforce-to-Evolved Office field mappings.
- Confirm that each Salesforce field is mapped to the appropriate Evolved Office field.
- Most fields sync both ways.
- System fields (e.g., Account Name, Owner) sync from AgentDealer only.
- Enable or disable synchronization based on your organization's needs.
- Click Save Mapping.
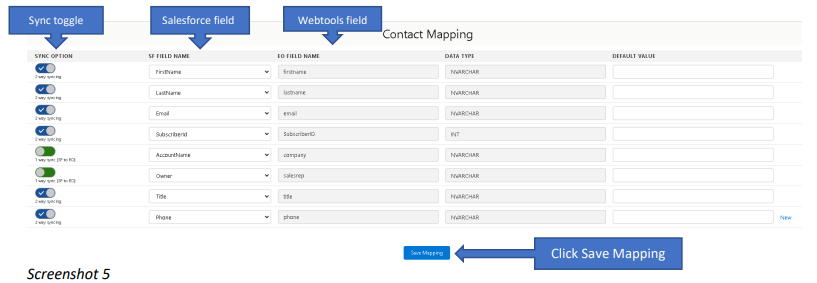
Most supported fields can synchronize between the two systems. Certain system-related fields, such as Account Name or Owner information, may originate from AgentDealer only.
Recommended Admin Check
Use a test Contact to confirm that the information you expect to synchronize is transferring correctly before rolling the integration out to users.
🚀 Future updates will allow up to 10 additional custom fields.
Step 5: Add the “Add to EO Campaign” Button
The Add to EO Campaign button allows users to send Contacts into Evolved Office campaigns directly from the AgentDealer environment.
Because this functionality is configured through Salesforce, you will add the button to the appropriate Contact layouts.
Add Button to Contact Object
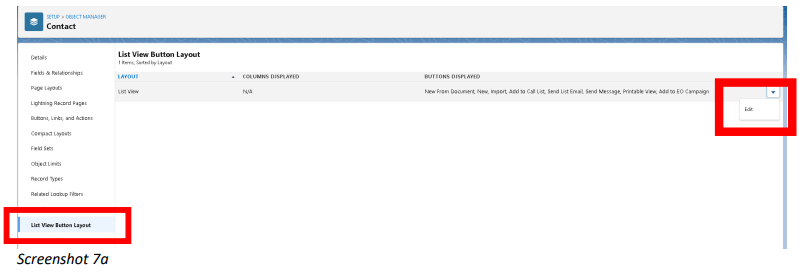
- Go to Setup → Object Manager → Contact
- Open List View Button Layout
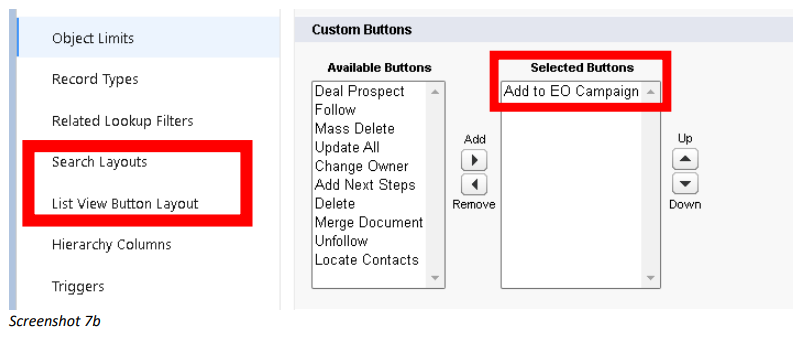
- Add Add to EO Campaign to Selected Buttons
- Repeat the same step under Search Layouts
Add Button to Page Layout
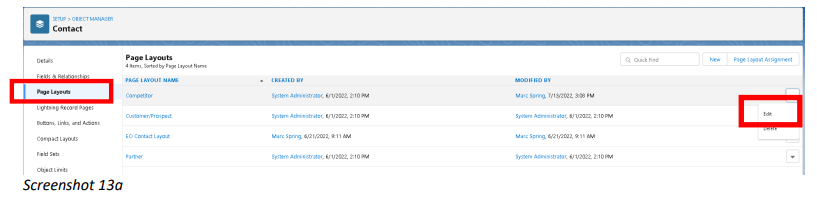
- Open Page Layouts
- Edit the active Contact layout
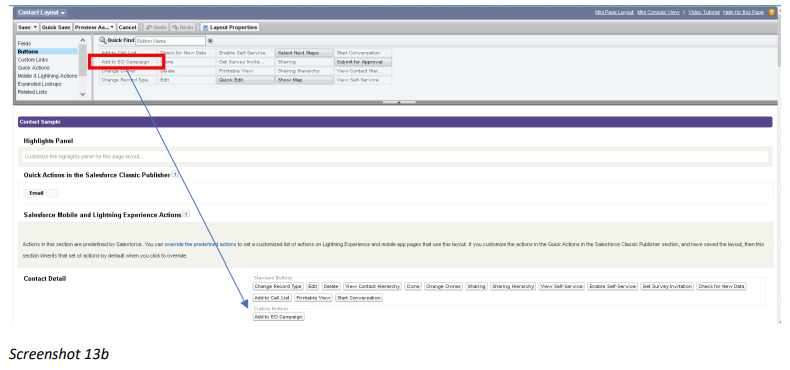
- Drag Add to EO Campaign into the layout
- Save
Step 6: Make the “Add to EO Campaign” Action Visible
In some Salesforce Lightning layouts, the action may be configured correctly but still appear inside an action dropdown.
If users do not immediately see Add to EO Campaign:
- Edit the Contact Lightning Page.
- Select the header or action section.
- Review the Visible Action Buttons setting.
- Increase the number of visible actions if needed.
- Save the page.
Reopen a Contact record and verify that the action is now visible.
Step 7: Add the Evolved Office Engagement Tab (Contact Level)
You can display Evolved Office engagement activity directly on an individual Contact record.
This gives users access to available engagement history, such as email opens and clicks, without leaving AgentDealer.
Add the Evolved Office Tab
- Edit the Contact Lightning Page in Salesforce.
- Add a Custom Tab.
- Name the tab Evolved Office.
- Drag a Visualforce component into the tab.
Configure the component using:
Visualforce Page Name: ContactDrillDownVF
Height: 1100
- Uncheck Show Label.
- Save the page.
Check Your Work
Open a Contact record and select the new Evolved Office tab.
The Contact's available Evolved Office engagement information should display within the record.
Step 8 (Optional): Enable Deal Creation Without a Business Name
Complete this step only if your organization wants Evolved Office workflows to create prospect deals when a Contact does not have a Business Name.
By default, the applicable AgentDealer prospect deal configuration may require a Business value.
To make the field optional:
- In Salesforce, go to Setup → Object Manager → Deals.
- Open the Prospect Layout.
- Select the Business field.
- Uncheck Required.
- Save the layout.
Important: This changes the field requirement for the applicable layout. Confirm that allowing Business to be optional matches your organization's sales process before making the change.
Step 9: Test the Integration
Before making the integration available to your full team, complete an end-to-end test.
Administrator Check
Confirm that:
- Evolved Office for Agent Dealer opens from the Salesforce App Launcher.
- The administrator sees the expected Evolved Office tabs.
- EO Set Up shows a successful connection.
- Sync Enabled is turned on.
- Field Mapping has been saved.
- Test Contact information synchronizes as expected.
User Check
Using a user with the appropriate Evolved Office Permission Set:
- Open a test Contact.
- Confirm that Add to EO Campaign is available.
- Add the test Contact to an EO Campaign.
- Verify that the Contact is available in Evolved Office as expected.
- Open the Contact's Evolved Office tab.
- Confirm that the engagement information loads correctly.
If your organization uses EO Workflows, test the applicable workflow using test data before using it in production.
Setup Complete
Once the integration has been configured and tested, users can use AgentDealer and Evolved Office together to:
- Add Contacts to Evolved Office campaigns
- Synchronize supported Contact information
- Access Evolved Office campaign functionality from AgentDealer
- View Evolved Office engagement information from Contact records
- Use Evolved Office workflow functionality when configured
Troubleshooting
I Don't See the EO Set Up Tab
Confirm that:
- You are logged in as a Salesforce System Administrator.
- You selected Evolved Office for Agent Dealer from the App Launcher.
- The appropriate Evolved Office permissions are assigned.
If the integration was installed by another administrator or by your implementation team, confirm that your System Administrator account has access to the package.
I Don't See Any Evolved Office Tabs
Confirm that the affected user has been assigned the appropriate permission set:
- EO Agent Dealer Admin, or
- EO Agent Dealer Rep
Also confirm that the user has opened Evolved Office for Agent Dealer from the Salesforce App Launcher.
I Receive “User Not Found” or Cannot Connect
If the connection cannot be established:
- Verify the Evolved Office Username.
- Verify the License Key.
- Confirm that Sync Enabled is selected.
- Click Connect again.
If the credentials are correct and the connection still fails, contact Evolved Office Support.
Contacts Are Not Syncing to Evolved Office
Check the following:
- Sync Enabled is turned on in EO Set Up.
- Field Mapping has been saved.
- Required Salesforce fields are populated.
- The Contact is being added through the appropriate EO Campaign process.
Quick Test
Select a test Contact, add it to an EO Campaign, and confirm that the Contact and its mapped information appear correctly in Evolved Office.
The “Add to EO Campaign” Button Is Missing
Confirm that Add to EO Campaign has been added to the appropriate Contact layouts:
- List View Button Layout
- Search Layout
- Contact Page Layout
If the action is configured but still not visible, edit the Contact Lightning Page and review the number of Visible Action Buttons.
The Evolved Office Contact Tab Is Blank
Edit the Contact Lightning Page and verify that:
- A Custom Tab has been created for Evolved Office.
- A Visualforce component is inside the tab.
- The Visualforce Page Name is
ContactDrillDownVF. - The height is set to
1100. - Show Label is unchecked.
Save your changes and refresh the Contact record.
An EO Workflow Is Not Creating a Deal or Task
Confirm that:
- The applicable automation is configured in EO Workflows.
- The Contact contains the information required by your AgentDealer/Salesforce configuration.
- Required fields are not preventing the record from being created.
If you are intentionally allowing a prospect deal to be created without a Business Name, verify the configuration described in Step 8.
Frequently Asked Questions
Who should configure the integration?
A Salesforce System Administrator should complete the initial configuration because several steps require access to Salesforce Setup, Permission Sets, Object Manager, Page Layouts, and Lightning App Builder.
Why do some instructions say AgentDealer while others say Salesforce?
AgentDealer is the CRM your team uses, while Salesforce is the underlying platform on which AgentDealer operates. As a result, users work primarily in AgentDealer, but administrators perform many configuration tasks using Salesforce administration tools.
What's the difference between EO Agent Dealer Admin and EO Agent Dealer Rep?
EO Agent Dealer Admin is intended for users who need broader Evolved Office functionality, while EO Agent Dealer Rep provides more limited access focused on campaign-related functionality.
Can multiple users use the integration?
Yes. Assign each user the Evolved Office Permission Set appropriate for their role.
Can users view Evolved Office engagement for an individual Contact?
Yes. Once the Evolved Office Contact tab has been configured, users can view available engagement information such as email opens and clicks directly from the Contact record.
Can EO Workflows create a deal without a Business Name?
Yes, if your organization's process permits it and the applicable Business field requirement has been removed from the Prospect Layout. See Step 8: Optional — Allow Deal Creation Without a Business Name.
Need Help?
If the integration is still not working after completing the troubleshooting steps, contact Evolved Office Support.
When contacting support, include:
- A screenshot of the issue
- The affected user's role
- The step where the issue occurs
- Any error message displayed
- Whether the issue affects one user or multiple users
I think this version is stronger because it starts with the admin's actual configuration work instead of installation, and it keeps AgentDealer and Salesforce distinct throughout: AgentDealer for the CRM/integration experience, Salesforce for the underlying admin tools.