
Set up custom fields
Custom Fields can be set up for both Profiles (Channels) and User accounts. The most common usage of custom fields for profiles is to be able to easily customise the same message for different clients or locations - e.g., automatically including the relevant link for a particular location when posting to multiple locations - in the same way, that you'd use placeholders in an email campaign.
Alternatively, you can use User custom fields to record and store information for your users, eg. their ID within your company, who their sales contact is, the date that they joined you, etc.
This page will take you through setting up custom fields for both Profiles and Users.
Setting up a new custom field
- Select the cog icon on the top right-hand side of the dashboard and then select Manage Users from the menu.
Note: Only admin users will have access to set up custom fields
- Select Custom Fields from the menu on the left of the page.
- The process for adding custom fields is the same regardless if you’re adding this for Users or Channels. First, select the Category from the list to the right.
- Then, select the New Field button.
- Next, you’ll need to give your field a name in Field Title.
- You can then select whether the field is Mandatory and information must be provided when setting up a new user or similar or whether this can be left blank if needed.
- You then need to select what type of field you want to set up. For example, you can also use the URL field to send out custom links if for example you’re sending out the same message but to a number of franchises social accounts and you want the link to be custom based on the franchise.
- You can then select which order that field should be in under Other, e.g. should it be the first field that is filled in or the third. If the third, this should be set to 3.
- Once you’re happy with the settings, click the Save button.
- Once the field is set up, you can Edit or Delete the field from the Custom Fields area of the dashboard.
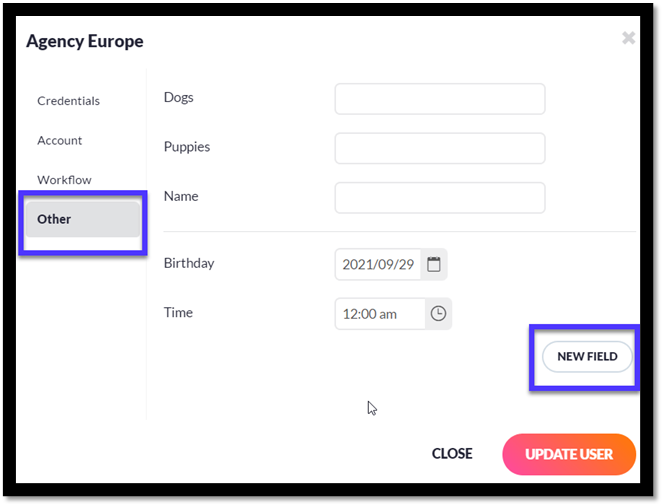
- When creating a New User or when managing a user you will have the option to use this Custom Field on an option called Other located on the user creation screen.
- You can also directly add New Fields under Other and the field will then be available when editing existing users and setting up new users.
Adding information into custom fields for a profile
- If you set up custom fields for profiles, this will be available once you’ve set up the profile by going to Profiles > My profiles.
- Select the three dots for the selected profile, then Tags from the options available.
- You can then add the necessary information into the field you have created.
Adding information into custom fields for a user
- When creating a new user or editing a user, select the Other tab in that user's settings.
- The custom fields you set up previously will be displayed so you can add in the relevant information for that user.
- You can also create new custom fields for users directly within this view but please note that the custom field you create from here will still be accessible for all users.
Searching for users based on custom fields
- Once you've added information into the Custom Fields for your users, you can then do advanced searches based on this information. First, select the Search box on your Manage Users page.
- Next, select the Advanced option.
- The Custom Fields you previously set up for your users will be displayed. Add in the word(s) you want to search for or, if it's a date field, select from specific date ranges.
- Click the Search button. Any users with matching information in their Custom Fields will be displayed.