
How to Use Journey Tracking in Evolved Office (Stats, Points & Recipient Insights)
How to Access Journey Tracking
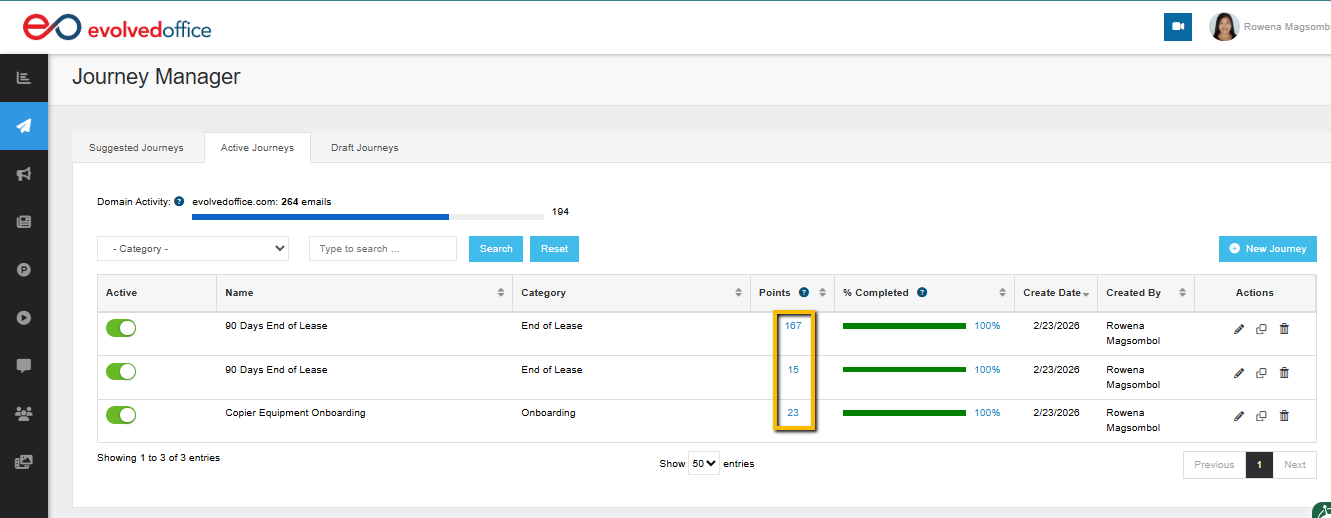
- Go to Journey Manager.
- Locate your Journey in the list.
- Click the Points value next to the Journey name.
This opens the Journey Tracking screen for that campaign.
Journey Header
At the top of the screen, you'll see key details about the campaign:
- Journey Name — The name of the campaign you're viewing.
- Sender — The user sending the emails.
- From Address — The email address contacts see as the sender.
- Date/Time Sent — When the Journey was launched.
- Contact Progress Bar — Shows how many contacts have moved through the Journey out of the total enrolled (e.g., "Your Journey: 724 contacts / 173 completed").
- Active / Inactive Toggle — You can pause or reactivate the Journey directly from this screen using the toggle in the top-right corner.
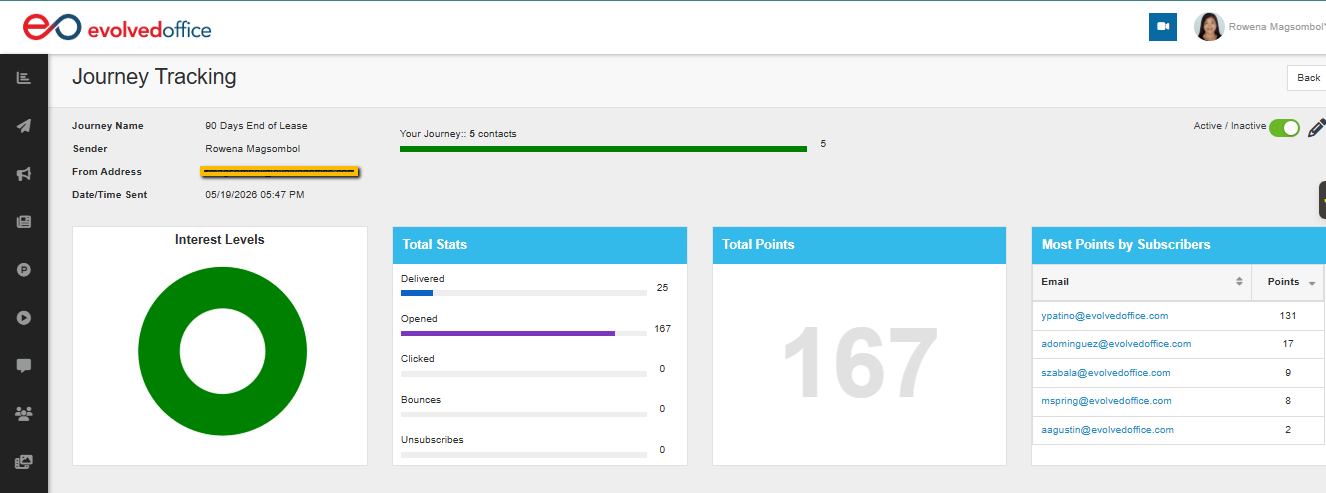
Interest Levels (Donut Chart)
The Interest Levels chart provides a visual breakdown of how contacts have been categorized at the end of their Journey, based on the Campaign Ends action.
The four interest categories are:
- Interested — Contact showed strong engagement.
- Somewhat Interested — Contact showed some engagement.
- Not Interested — Contact showed little or no engagement.
- Unknown — No interest level was assigned.
💡 Interest levels are set manually inside the Journey builder using the Campaign Ends action. See Understanding Rules and Actions for setup details.
Total Stats
The Total Stats panel shows aggregate performance across all emails in the Journey:
| Metric | Description |
|---|---|
| Delivered | Number of emails successfully delivered to contacts. |
| Opened | Number of emails that were opened. |
| Clicked | Number of emails where a link was clicked. |
| Bounces | Number of emails that could not be delivered. |
| Unsubscribes | Number of contacts who unsubscribed. |
Total Points
The Total Points number reflects the cumulative engagement score across all contacts in the Journey.
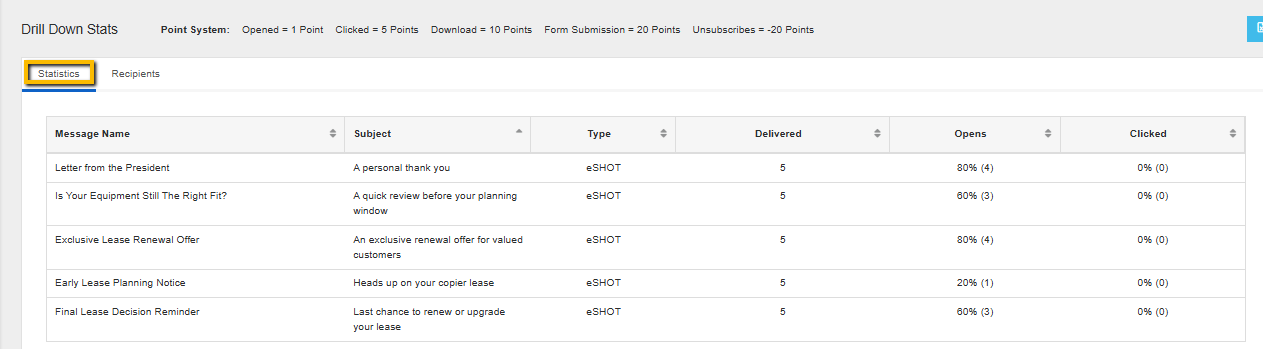
How the Point System Works
Points are calculated automatically based on how contacts interact with your emails:
| Action | Points |
|---|---|
| Email Opened | +1 point |
| Link Clicked | +5 points |
| Download | +10 points |
| Form Submission | +20 points |
| Unsubscribe | −20 points |
The higher the total, the more actively your audience is engaging with the campaign. You can use this number to compare performance across different Journeys over time.
Most Points by Subscribers
This panel lists the top-performing individual contacts in the Journey, ranked by their total point score. It gives you a quick view of your most engaged leads at a glance.
Clicking a contact's email address opens their individual tracking profile (see the Individual Contact View section below).
Drill Down Stats
Below the summary panels, the Drill Down Stats section lets you examine performance at the email and recipient level.
Statistics Tab
The Statistics tab shows a breakdown of performance by each individual email in the Journey:
| Column | Description |
|---|---|
| Message Name | The internal name of the email step. |
| Subject | The subject line sent to contacts. |
| Type | Email type (eSHOT, Newsletter, etc.). |
| Delivered | How many contacts received that specific email. |
| Opens | Open count and percentage for that email. |
| Clicked | Click count and percentage for that email. |
This view helps you identify which emails in your sequence are performing well and which may need to be revised.
Recipients Tab
The Recipients tab shows a list of every contact in the Journey along with their individual stats.
Available columns:
| Column | Description |
|---|---|
| Contact's email address. | |
| Contact | Contact's full name. |
| Status | Whether the contact is Active or has completed/exited the Journey. |
| Sent | Number of emails sent to this contact so far. |
| Points | This contact's total engagement score. |
| Opens | Total number of opens by this contact. |
| Clicked | Total number of clicks by this contact. |
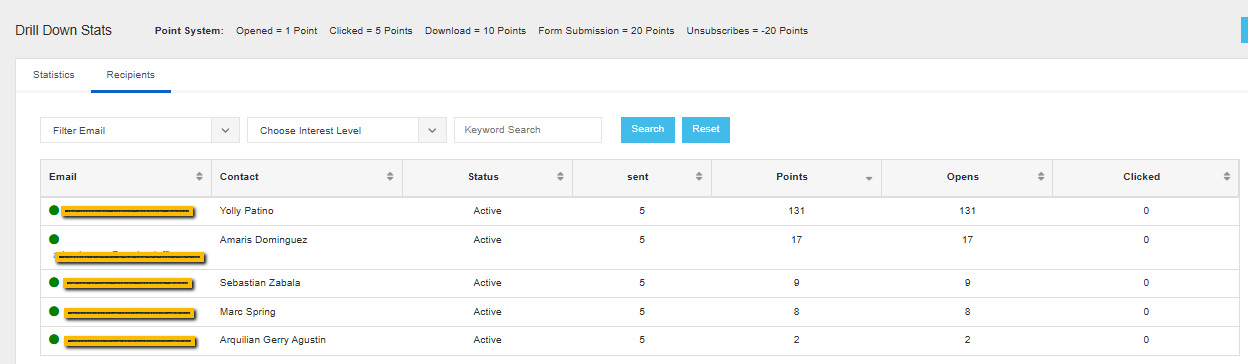
Filtering options:
- Filter Email — Search by a specific email address.
- Choose Interest Level — Filter contacts by their assigned interest level (Interested, Somewhat Interested, Not Interested, Unknown).
- Keyword Search — Search by name or other keywords.
Use Search to apply filters and Reset to clear them.
Individual Contact View
Clicking on a contact's email address from the Recipients tab (or the Most Points panel) opens a detailed profile for that contact.
This view includes:
- Total Points — The contact's cumulative score across all campaigns, not just this Journey.
- Points by Category — A breakdown of points earned by content category (e.g., General – Events & Prospecting, General – Cybersecurity, etc.), shown as both a donut chart and a ranked list.
- Top Scorers Table — A log of every email interaction, showing:
- Email subject
- Campaign name
- Content type/category
- Points earned from that interaction
- Date and time
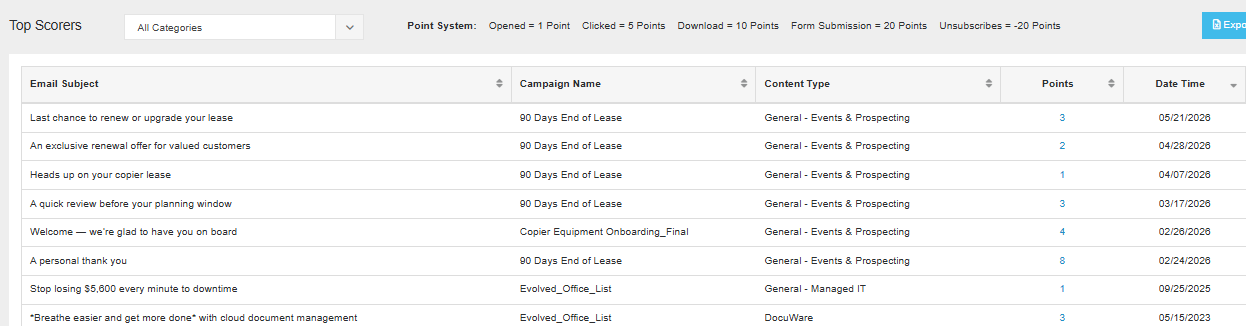
You can filter this view by date range using the From/To fields at the top, and filter by category using the dropdown above the table. There is also an Export button to download the data.
💡 This individual view is the same data that powers the Lead Scoring Dashboard. Contacts who consistently earn high points across campaigns are your warmest leads. See How to Use the Lead Scoring Dashboard for more.
Tips for Using Journey Tracking
- Check the Statistics tab first to identify any underperforming emails in your sequence — low open or click rates on a specific step may mean the subject line or timing needs adjustment.
- Use the Recipients tab to find contacts who haven't engaged and consider moving them to a different Journey or list.
- Sort by Points in the Recipients tab to quickly identify your hottest leads and prioritize follow-up.
- Use Interest Level filters to segment recipients for your next campaign — for example, pulling everyone marked "Interested" into a follow-up outreach list.